

Roofer Regrets Refinishing Hardwood
- Home Case Studies Roofer Regrets Refinishing Hardwood
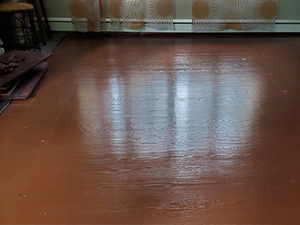
 This recently refinished floor in Yardley looks more like plywood, it's totally botched and screwed up!
 This overstained hardwood floor in Yardley is out of control!
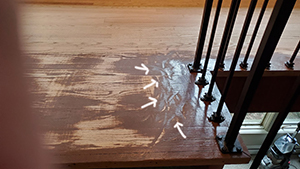
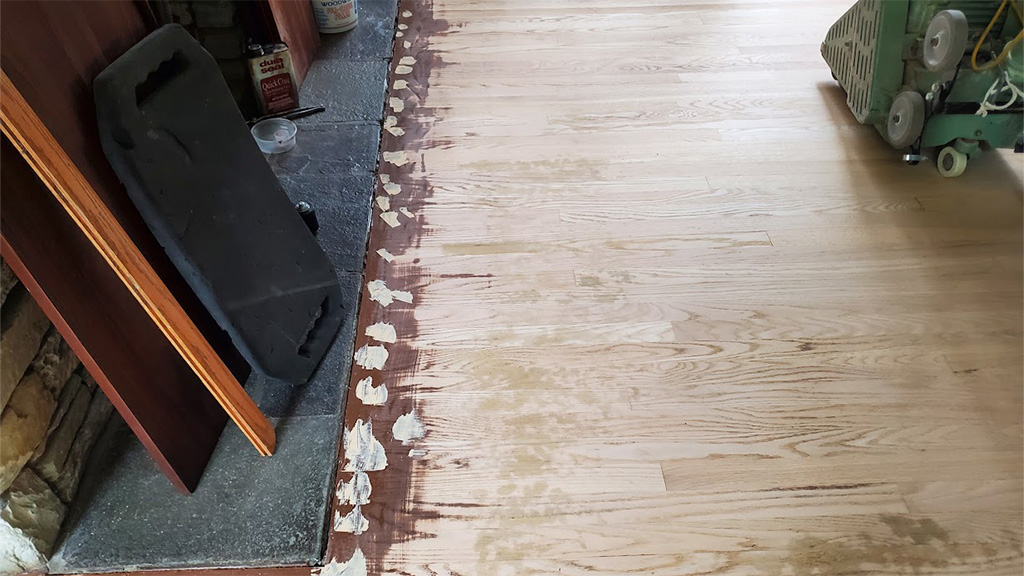 We got the drum marks removed from this hardwood floor
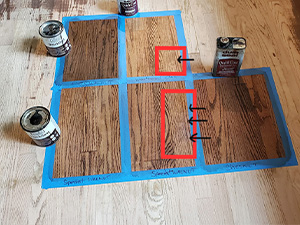
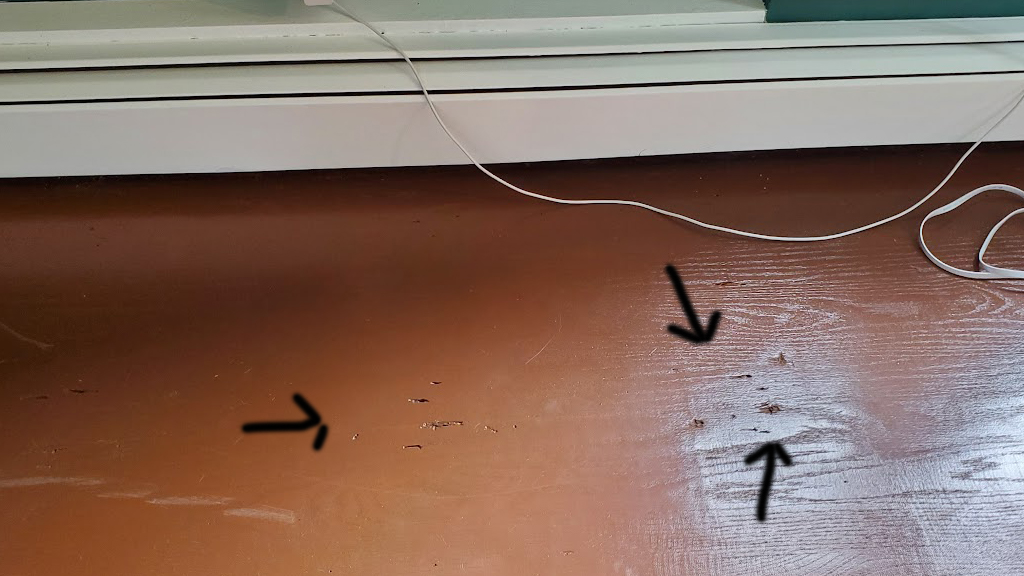 Another example of a poorly refinished hardwood floor job- why are these holes not filled?
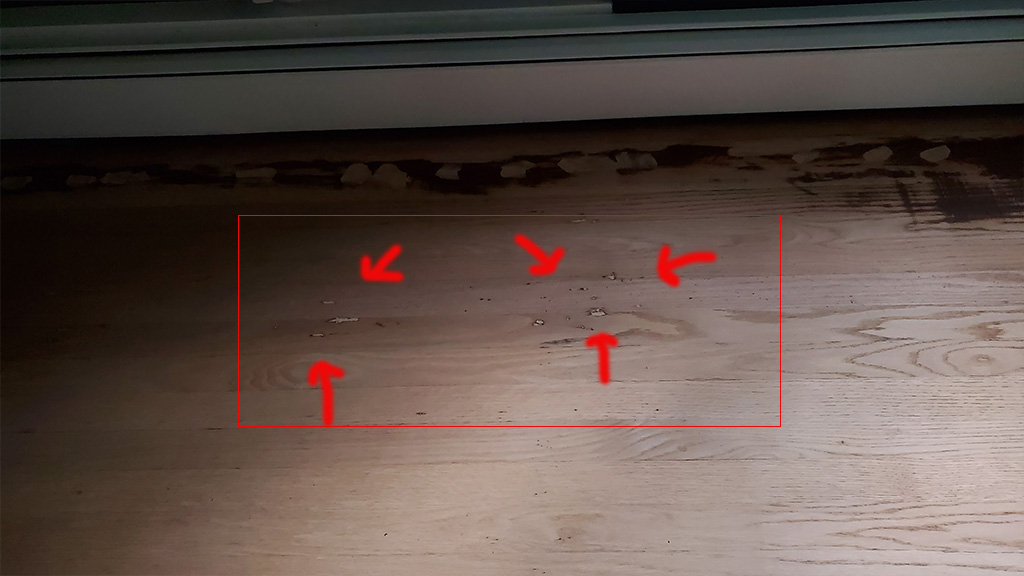 Before staining we fixed the holes in the oak boards that were left by the previous finisher (sloppy work)
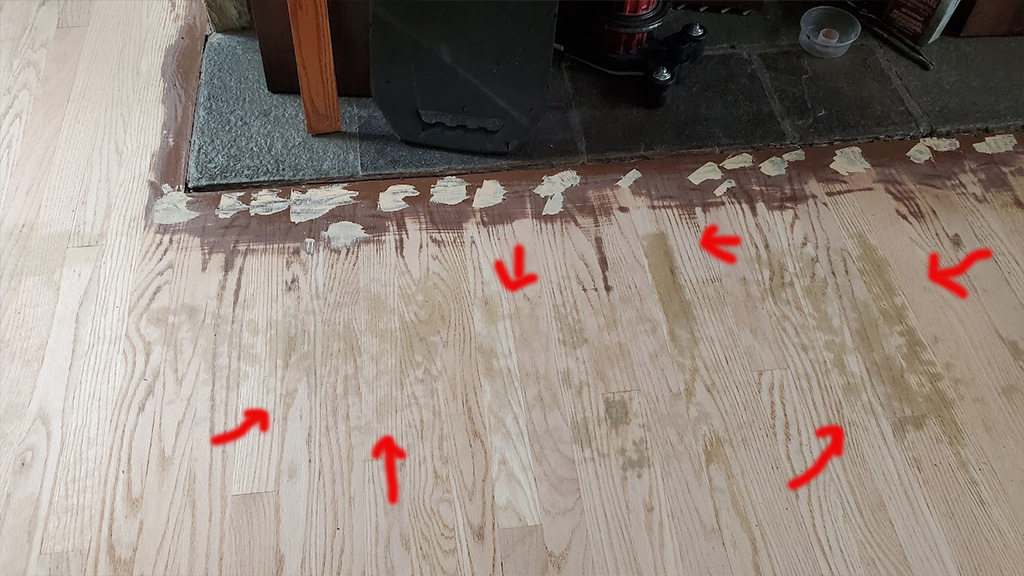 With sanding done the stain choice will need to be dark enough to mostly cover the stain
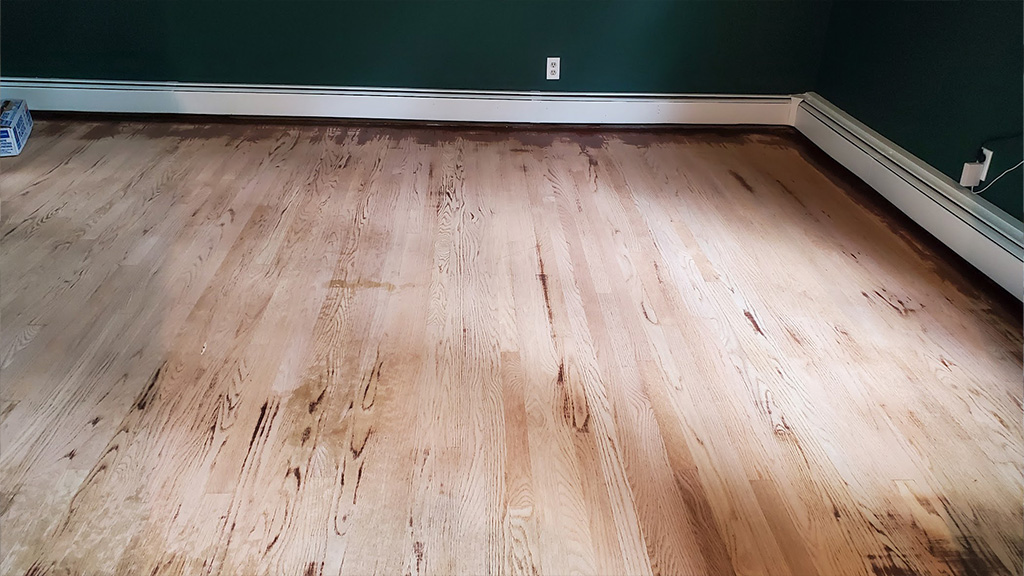 This is the first 'cut' that removes the badly stained den floor
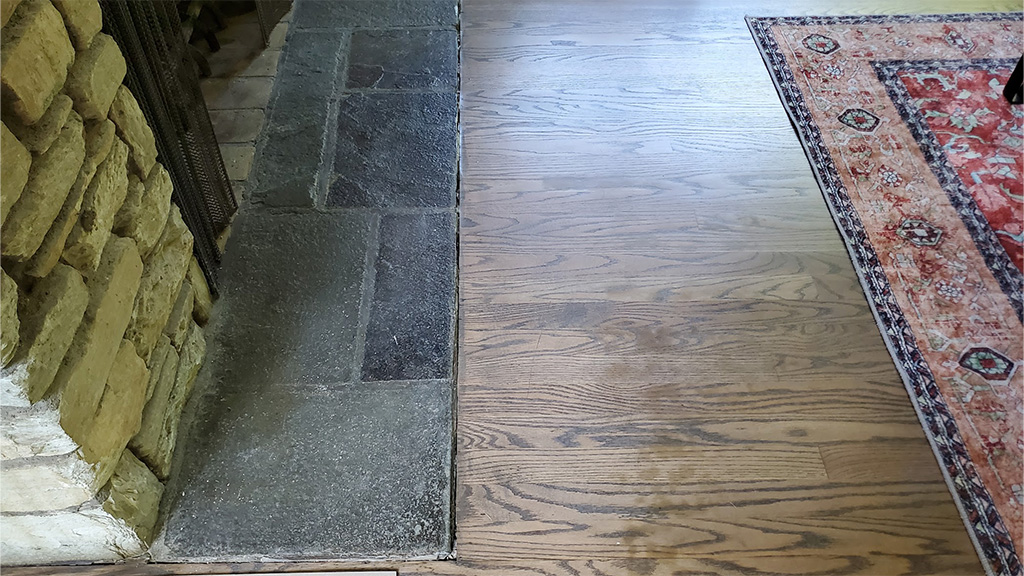 A far cry from where this floor started, the clients love their floors
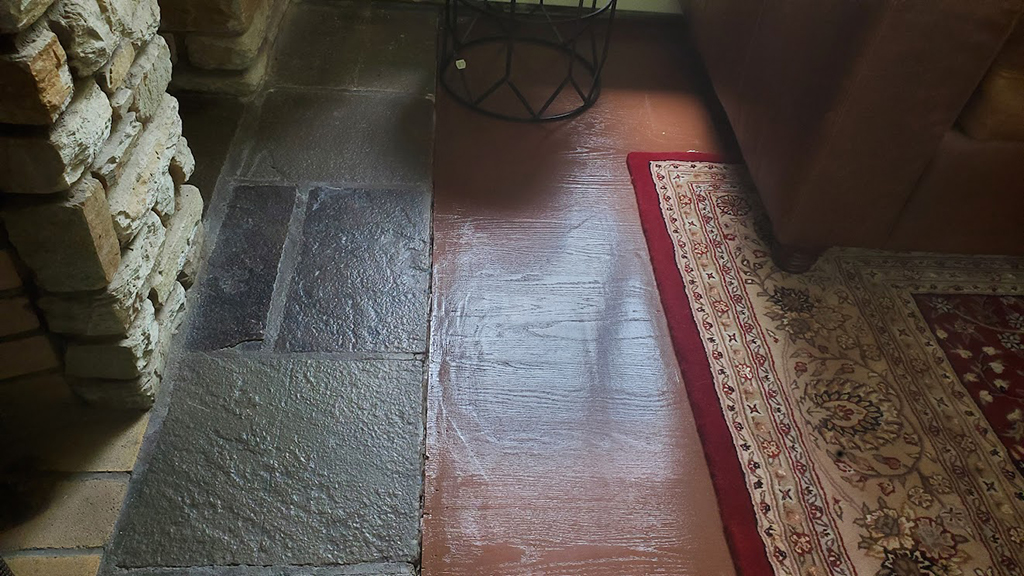
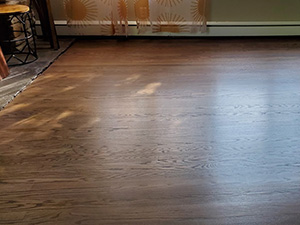
 From where this floor started, this fireplace room red oak floor is stunning!
 An entry view of the den all refinished
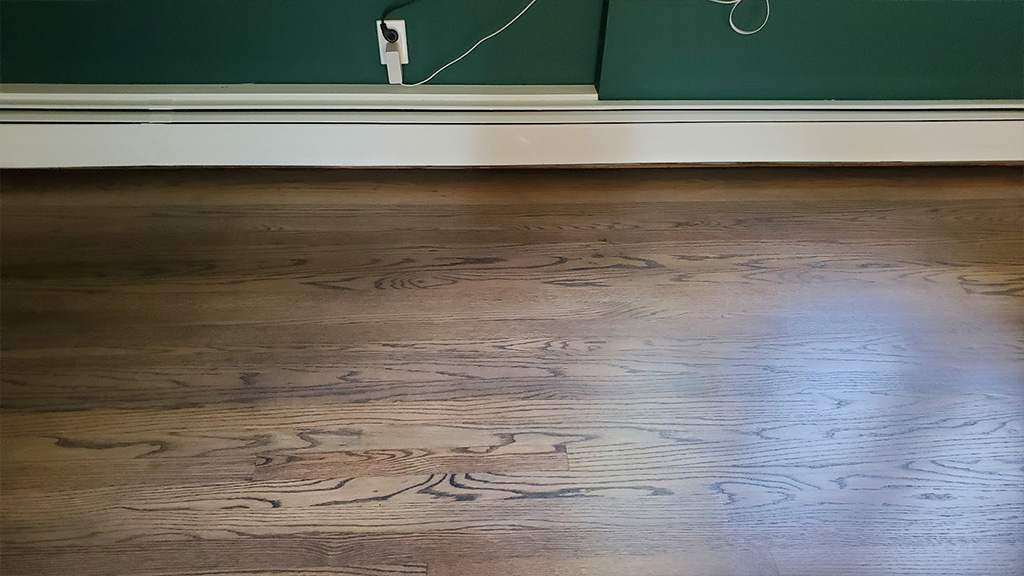 Even the holes from the original refinishing are gone, this is a beautifully refinished hardwood floor
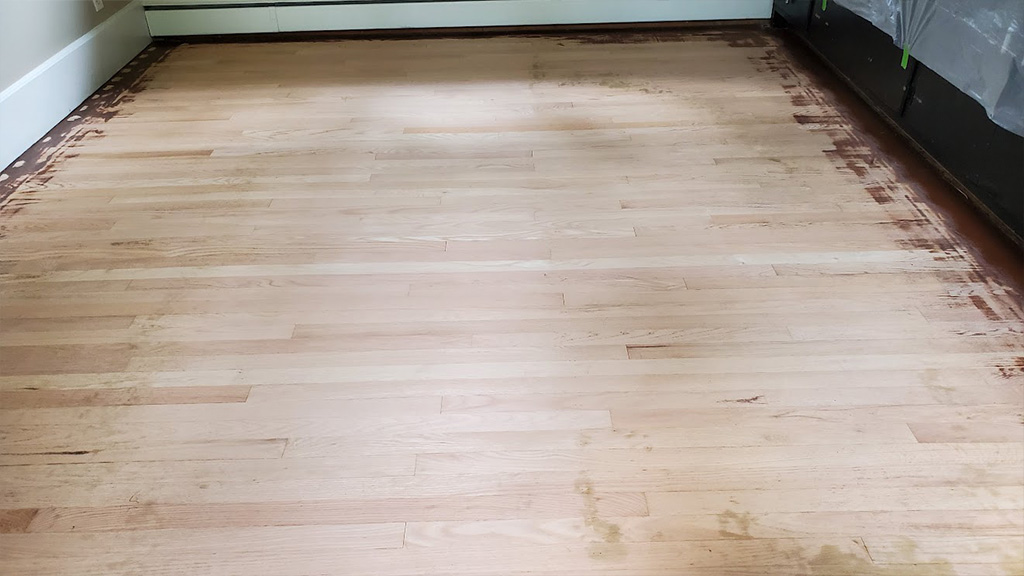 Here is the first pass of sanding the bad stain off the dining room
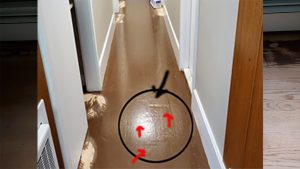
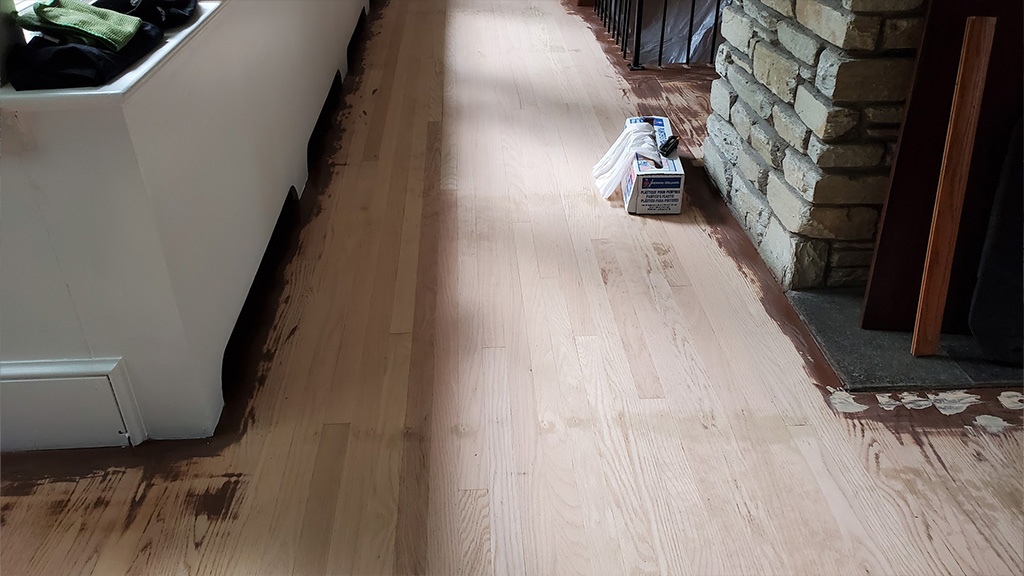 More of the staining nightmare is erased from the hallway-balcony floor
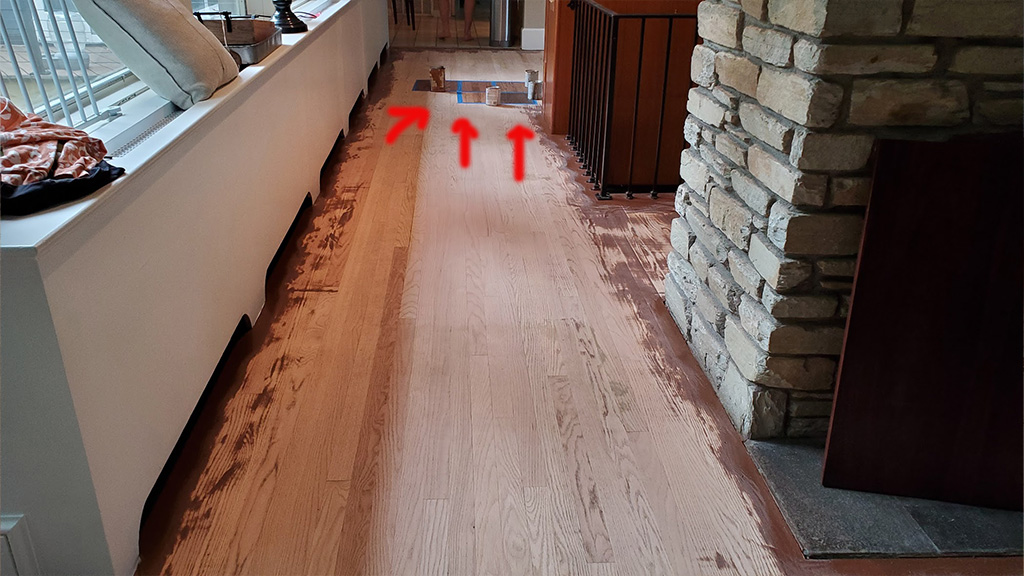 All sanded, the stain samples are put on the red oak floor
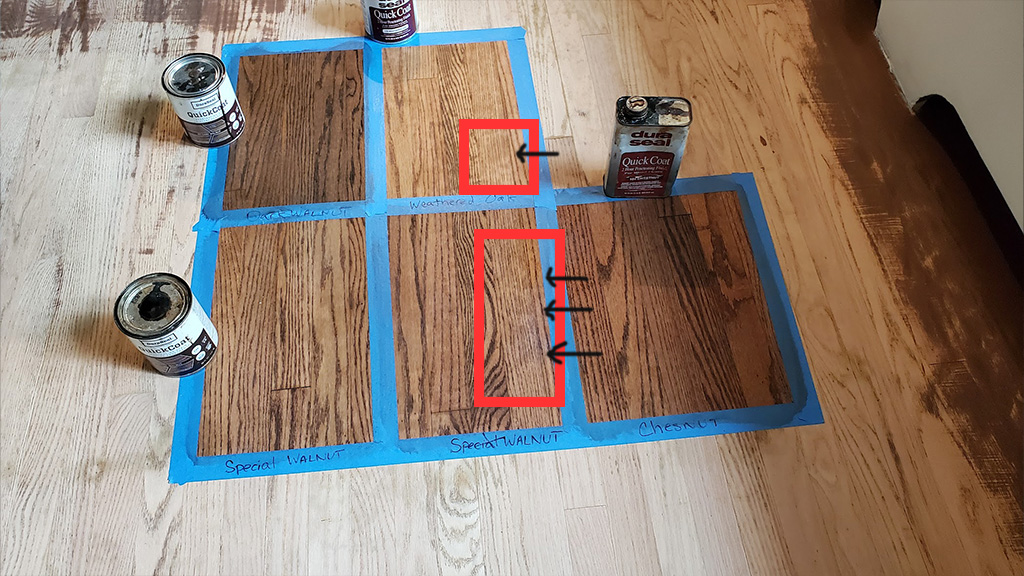 Stain samples were applied over the pad damage to make sure it calms down what you see when its finished
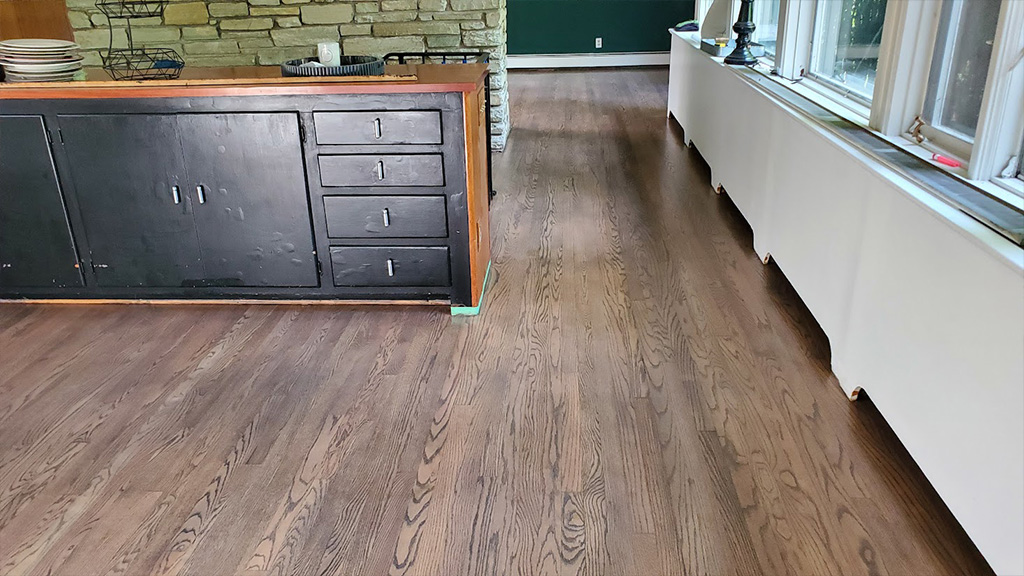 Look at how the dining room should have looked and now is since we fixed and refinished the floors
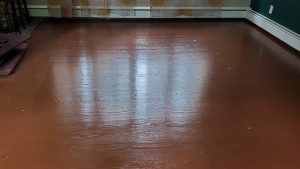
 Although there are major shadows (like bottom middle area) this dining room floor is uniform and gorgeous
 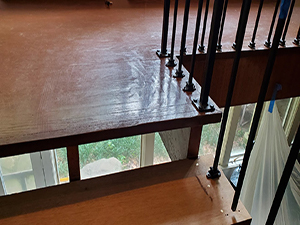 This is a failed hardwood floor refinishing attempt
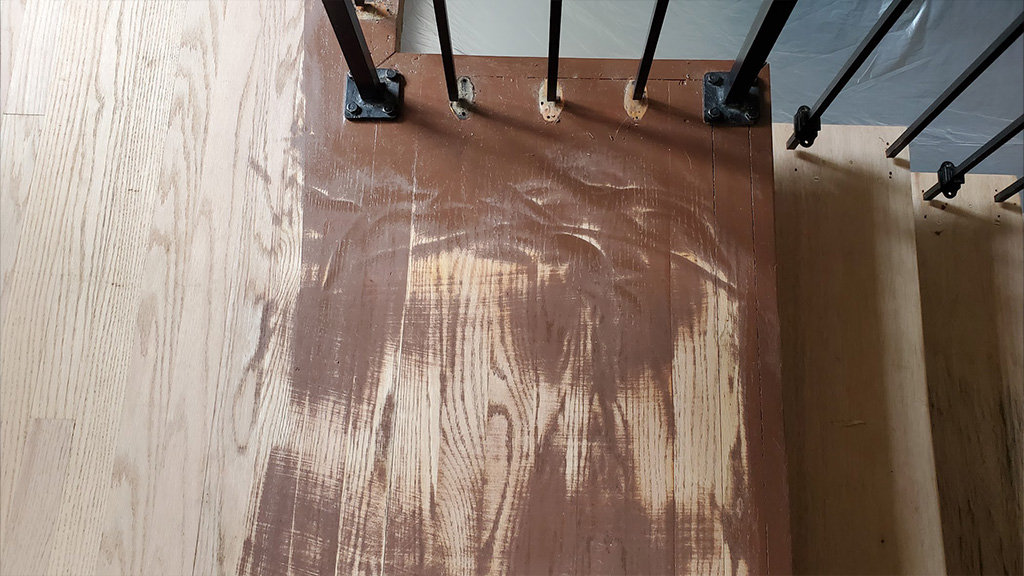 Erasing the mess, much of the stain is off, but the edging will remove the flawed-wavy edger digs
 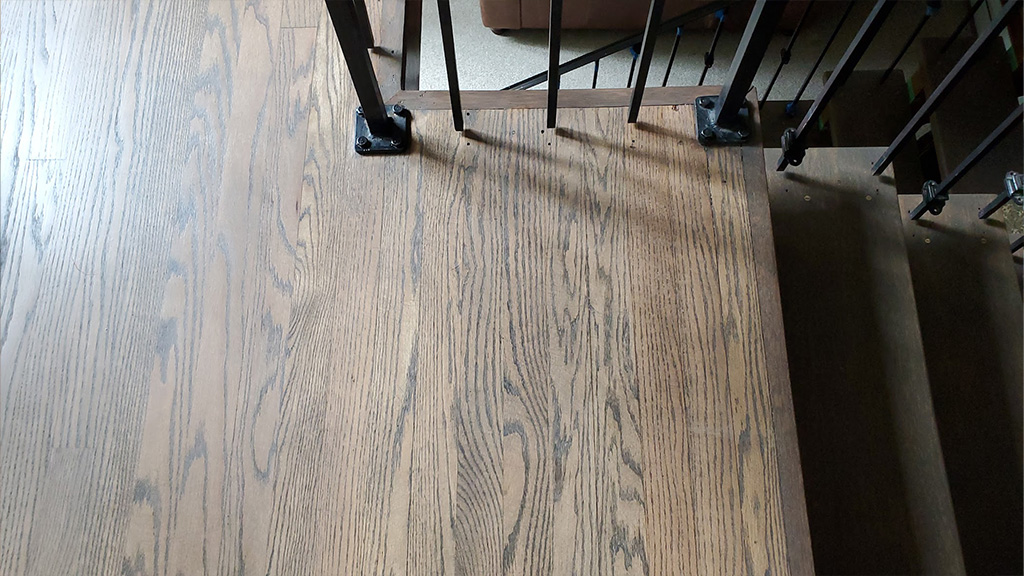 What a difference now that we sanded, fixed and refinished the landing/balcony

When Work Comes Back To Bite You
Yardley client calls desperately for help.
After finding our post about “Fixing a Botched Hardwood Floor Job” she knew she had to call us.
She says she had experienced a botched hardwood floor attempt, and she started to explain. Explaining they are new owners of a home in Yardley, and were having a lot of contracting done. A new roof went on, a new railing was installed on the deck, and electrical was being upgraded. But the remaining inside project, and the premiere project before moving in, was refinishing the hardwood floors. So there was a lot going on.
To begin with they were comfortable with the existing team of workers. Starting from the top down they saw commitiment and hard work on their behalf. With having workers showing up being half the battle they had a trusting comfort in expanding the work scope with them.
And then she revealed that their fatal mistake, allowing the roofer to do the hardwood floor refinishing. Liking their hard work overall, the owners felt it was a good fit.
Sight unseen, this was a mistake.
The roofers dove in. And while the owners patiently watched, things went south. In a panic about the work, they nicely called out the contractor. The owner, seeing the work firsthand and mortified, took full responsibility. They agreed to work it out, and wanted to make it right for the customer.
Our client decided to ‘switch’ things out on her own terms.
Christine started researching online. She found our case study about a screwed up hardwood floor job. Impressed she called me and said “Help, I have a botched hardwood floor job I need fixed, can you help me?” Using the word botched I knew she read about the job I posted entitled Fixing A Botched Hardwood Floor Refinishing Job.
As I listened as she explained what happened. When I asked her where her house was she told me Yardley, PA. (Although not close, we have done work there, and would consider it.) I set up an appointment do an estimate for them.
About at the site she let me know the contractor who screwed up was joining us.
Ok. She explained that they have been very good about making it right. They wanted to listen to what we would be proposing, critique their work and hear about our proposed resolution.
From the moment we arrived we saw how it was a delicate and dicey situation. We gently dove in. On one side we had to assess how to fix it. On the other side we had to offer solutions. They admitted they shouldn’t have attempted this job. But with damage done they were sincere in wanting to make it right. (I sensed although it was a delicate situation both parties wanted to work it out without it going legal.)
We entered the house and right there what Christine described was “dead on.”
From the start the stair debacle hits you right in the face! In the foyer looking right was a slate stone foyer, a stone (fireplace) wall, and just beyond were open stairs. A short set up, and a full set down. At first glance we saw the following:
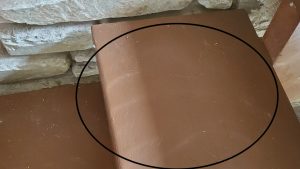
- The stair treads were like a brown (use your imagination to describe the color), totally painted. Not one ounce of the grain popped thru the over stained application.
- The sides of the treads near the spindles had severe edger digs
- The treads were sanded against the grain (in the opposite direction)
- Some had deep waves in them
Climbing the stairs more of the mess hit us in the face.
- Sanding was against the grain
- Incomplete sanding left rough grain resembling plywood
- Painted stain totally obscured the wood
- Edger digs were everywhere all along the edges of the floor & balcony
This was but the tip of the iceberg!
The main entry ‘focal point’ looked terrible. The floating stairs against the stunning stone fireplace wall was overcome with yards of shiny brown ‘wavy’ who knows what (or you know what)!
Quietly we navigated choosing careful words to describe what we were seeing without offending them. Diplomatically we concurred it had to be fixed. The contractor agreed as well. To see how and what we did first, to fix the stair project⇔ click here to see how they turned out when they were fixed.
Beyond the stairs, evidence of failed workmanship was everywhere, but the most chronic failures were:
- sanding, or lack there of
- working against the grain
- Drum marks “divots” were deposited when the refinisher engaged the drum (dropped it down) while stationary
- Edger digs looked like “waves at the beach”
- the staining was more accurately painting, not at all staining (especially because it was rolled on exactly the way paint is rolled on, and left as a finished product)
Again, summarizing we just couldn’t make this stuff up!
On the largest scale, the painted, not stained appearance hit you everywhere you turned. You just couldn’t get away from it!
Not gonna lie, the appearance of these floors was horrendous. In no way, ever, or in any shape or form should this be characterized as a finished product. But with the contractor right we had to be honest but not offending. Pointing out the problems, providing an explanation of what went wrong, we offered a solution to fix things. We provided both hope for resolution and confidence that this is a temporary reminder of ‘im-permanent’ situation! (Off piste’ and yes disjointed, a pun is intended for those in the know)!
Between the ‘over staining’ which obscured all the grain, a plethora of ‘drum divots,’ and waves of ‘edger marks’, these floors experienced significant trauma.
I felt the pain for the customer, and for the contractor too!
Clearly this was an unfortunate for everyone involved. Having a diplomatic conversation the contractor over and over again they couldn’t apologive enough.
But when they showed us a video of the work being done we were absolutely aghast and speechless!
The fatal mistakes were abundant!
The video validated the obvious, and the disdain building up in our minds was of epic proportions, tipping the scales of being quietly but completely horrified!
Gouges, “half moon” edger digs and divots, this sanding job was terrible.
According to the NWFA, there is a schedule of sanding to be followed. It usually begins with rough cuts, and progresses to finite passes that produces a smooth, consistent and flat surface. A rough cut is usually a 36 grit, or 50 grit. If it is a rough floor, or one with ‘aluminum oxide,’ the refinisher may even start with a 24 grit, or 33 grit. All in all it may be as follows:
- 36 grit
- 50 grit
- 80 grit
- Screen to 100 or 120
- buff
- repeat all on edges
- scrape the corners
- tack and or vacuum the floors
Indifferent to what they did, there should have been a lot of work done to prep the hardwood floors.
Successful sanding takes a keen eye, a close visual, and a steady hand. It’s almost a ‘dance or a caressing motion’ done with the machinery. In total the floor is worked over 5-8 times, or more before staining. And it should have been best executed by someone who does it day in and day out!
The contractor admitted they did about 1/3 of the sanding. And it showed!
Even seasoned Master Carpenters won’t refinish wood floors because they don’t run the machines regularly.
Occasionally we come across Master Carpenters who will tell us they won’t’ do sanding because they don’t run the machines regularly. They know there is a finesse’ in using them.
You stop, you leave a divot. . .
Drop (or engage) the drum while still, you’ll leave a ‘hot dog size’ depression on the floor called a ‘drum mark’. Lean on one side, you leave a gouge. Have a hiccup or sneeze, you leave a mark. You compensate by
leaning while holding the god-awful heavy edger, you will leave ‘edger digs’. It truly is a finesse or dance. And if you don’t do it everyday, you probably “ain’t” gonna do it right!
The sanding was a half attempt at best.
Fatal mistake, you never go against the grain of the wood!
This floor was sanded in any and every direction that moved the refinisher. The edger ‘man handled’ his edger along all the edges everywhere, and wavy digs were abundant. The floor had inconsistencies. Patches of roughness and waves were prevalent. Drum marks were everywhere, and left every time the drum was engaged to the floor. In the hallway the refinisher got too close to the wall. Hitting a wall just enough to have to stop to clear it resulted in deep drum marks. In example, where the machine caught against the door casing a drum mark was left. They were so deep we thought (but didn’t) have to replace several boards to fix them.
Then on to the next round of mistakes, the staining.
With a paint tray and a long handled paint roller, the workers were paint rolling the stain on the floor.
And again, referencing the video, it told no lie. This to them was acceptable work executed for an acceptable finished product!
The stain was rolled on the floor, in the opposite direction of the floor, again proven by the video. They rolled it on from a standing position, in a ‘willy-nilly fashion’. They never wiped the excess stain off. It was left as is. In a proper manner, if hand applying it, you have a stain rag (cut up pieces of a cotton tee-shirt) to quickly and thoroughly wipe it off, not leave it on full strength.
To properly apply the stain many refinishers hand apply the stain.
Instead, on your hands and knees across the floor you “rag” it on with the stain rag, and “rag” it off with a clean rag. The clean rag absorbs the excess stain, and allows for the excess stain to be removed, which reveals the beauty of the grain. The color is a transparent application, an opaqueness, not a total coating that completely covers to wood like paint. The goal is to add color, but allow the grain to show through.
Even the hand pattern of the stain and wiping it off takes finesse!
Your best off to have a careful steady hand when applying the stain. You want it in a consistent repetitive motion.
Ouch, and referring back to the video to see how this task was done, it again was painful to watch. The tell tale signs of not having a clue were obvious and hit us in the face. We elaborated over and over again, with respect. It was an honest accounting of what we saw, and humbling.
The finish needs an orchestrated motion when being applied too.
Not any which way you want, the finish has to be applied methodically, and ‘WITH THE GRAIN!” The corners and edges get applied with a small pad. To do this you pour the finish on, and only enough to work a section. In the main part of the floor you pour a puddle of finish and stroke it along with a “tee bar” and lambs wool pad. The finish gets massaged and carried, in the direction of the grain. It is caressed along the edges to blend in, and then moved across evenly with a sweeping motion. It should not be too thick, nor too dry.
More like a dance while applying the finish, it might be compared to that of an artist’s watchful eye and stroke!
In actuality, when watching our guy perform this task, it is with a ‘whispy’ motion. He is constantly looking and watching from above straight on. Then he looks again with a tilted angle from side to side. No better way to describe it— it is a dance for sure!
Seeing enough, this was a screwed up job from start to finish, or from stem to stern, no matter which way you look at it!
Knowing we could fix the “botch,” we offered promise to both the customer and the contractor.
It was unclear to us who did the work. Until we asked we didn’t know, but they came right out and said it was their staff, not subcontractors.
They told us what was done and what equipment was used. On the spot they asked us to explain what we would have done differently. Offering relief, we told both the client and contractor we’d get them an estimate quickly.
Before departing we said we could remove the “paint,” and probably most, if not all of the damage. We would fill the holes and refinish the floor properly, and erase the nightmare. Frankly our steady hand was relieving to both.
Leaving the house we walked to our car with the contractor reps.
With a promise to ‘right the ship’ we did ask what they were charging the client, and they named their pricing. They also acknowledged based on our review of tasks that our price would be well north of theirs. They were right.
I was forthright in saying they were very lucky this is still a friendly exchange. If gone legal they would have lost their shirt. I declined to share a remark told to me by a consulting certified wood inspector said regarding the job.. Often brought in as a consultant on projects, he is a court’s expert witness on legal hardwood floor matters. Besides reporting them to the ‘BBB’ they should have their “a__”handed to them. And quoted,” If you need a cardiologist for a heart matter, you don’t see a proctologist!”
Shaking hands I offered promise that we would get them out of the ‘hot seat’!
We called Christine the following day.
We gave her a verbal quote to which she immediately said “when can you start?”
Great news, but now we had to do a schedule “dance!” With about 4 deposits of jobs ahead of theirs, and one of which is a listing come September, we were offering options. We would have to work them in as we could, perhaps splitting the job in 3’s. As we finished the previous jobs we could maybe sneak them in here and there.
Revealing our hand shake with the client, I called the contractor with the news.
I reaffirmed that we would restore the floors and offer relief without gouging them. I did intimate our fee would be substantially above their charge. We did explain it the time allowed would be for the proper sanding schedule. They were accepting.
And without knowledge of the money exchange to right the wrong, I assured them I wasn’t taking advantage of them.
Hardwood floor refinishing is a continual learning experience, and one Mother Nature holds always holds some secrets about!
Any seasoned refinisher will tell you it is NOT an exact science! There is a lot going on to properly refinish a floor. There are a number of things that can “keep you on your toes!” It honestly is a continual learning experience, and very few have enough experience to say they have seen it all!
For us, we’ve been at it about 10 years, our wood technician about 15.
Honestly we are always learning even years in it!
Besides the ‘ojt” (which can be painful at times like this one), there is a tremendous support system standing at the ready to help us. At the ready stand suppliers, the manufacturers, the NWFA (National Wood Flooring Assoc.), certified wood floor inspectors, and instructors, as well as colleagues. It’s a great support system. Even You Tube videos are informative and helpful.
Bottom line is, this work should be left to experienced craftsman. They never should have attempted this work.
The contractor further asked, moving forward would we consider doing their hardwood floor refinishing for them.
Well, the answer is yes, and they cited a job in center city. Then one of the reps said he wanted his floors done.
When Christine returned, we got the color confirmed.
Side bar, but kinda cool thing! Hubby told me Christine flew to Wisconsin, and would be back Wed night.
Apparently she had just returned from hauling some famous important guy’s cargo to Wisconsin, (name starts with a “B”).Hint- ( it’s not his “beast” this time). Any guesses?
Now home, she jumped right in on deciding on the color.
While on her trip we sanded and revealed pad stain-age that would remain on the floor. At this point we realized we couldn’t offer a clear coat as the pad stain would look hideous. Instead we would have to introduce a color that would obscure the pad discoloration and not make it stand out.
S0 several samples we put down, and she took her time. The stock colors weren’t a fit. We next tried a couple custom blends, and they approved a mix. Not too dark, but dark enough to absorb permanent stain-age’ from the rubber carpet pad.
(Reversing about 95%, Christine was willing to accept a tad of discoloration in exchange for a medium brown tone that pulls all the elements together.)
“I am obsessed with the color of my floors! Marvin Crushed it!”
From the moment Chris had her first eyes on things the reveal hit Christine ‘dead on!’ And of course her hubby Clint concurred. And, by this time her parents, visiting for the week were impressed, and asking would we travel to Williamsburg! They flip houses for a living, and have wood floors needing refinishing too. Clearly having a trained eye for our craft, they liked what they saw us doing, and gave us an eye of approval. You Guys Crushed It!
The healing began.
We arrived and got organized as to how we would do things. First up would be the stairs, the fire place room, hall and the kitchen. In a mere couple of hours the stair treads were sanded. The painted brown color on the mahogany treads was removed and the edger digs were history! (Thank goodness, we were concerned that we couldn’t promise complete removal, but we were able to. And we even got the ones close to the spindles too!) Yes!!!!
Besides the color, Marvin has corrected about 95-98% of the poorly executed work, and erased it from “the canvas!”
On day one he began erasing the nightmare:
- the “paint job,” meaning the brown paint (stain) was removed, revealing the grain of the red oak
- all of the edger digs were removed, from the stairs, the landing, and all along the edges
- the tell tale signs of the sanding and the roller marks that worked across the grain disappeared
- the uneven-ness’ of the sanding was eliminated
- the holes in various places were filled with putty and became a non-issue
- all but a few of the drum divot marks remained
From this point on they could see progress and the nightmare disappearing. Although wanting everything fixed (like yesterday), they were patient and extremely happy to see things were being erased and corrected.
But, it turns out that the evidence of poor execution is all but gone! Marvin looks like a hero. As a result of his work their floors look amazing! Relaxing, our clients have said their blood pressure was relieved. They put the experience behind them. Now the floors harmoniously tie all the elements in the home together.
And now, as they packed, and headed out I think I even heard them singing with glee as they went on holiday, “on the way to Cape May!”
Need a “botched hardwood floor job” fixed? (Whoever did it!) Relief is only one call away! Call us at 609.953.0472. Contact Us on line and we will reach out to you!


Your opinion is important for us!
Click to share your review