

Leaky Door Fixed Now Hardwood Floor Refinished
- Home Case Studies Leaky Door Fixed Now Hardwood Floor Refinished
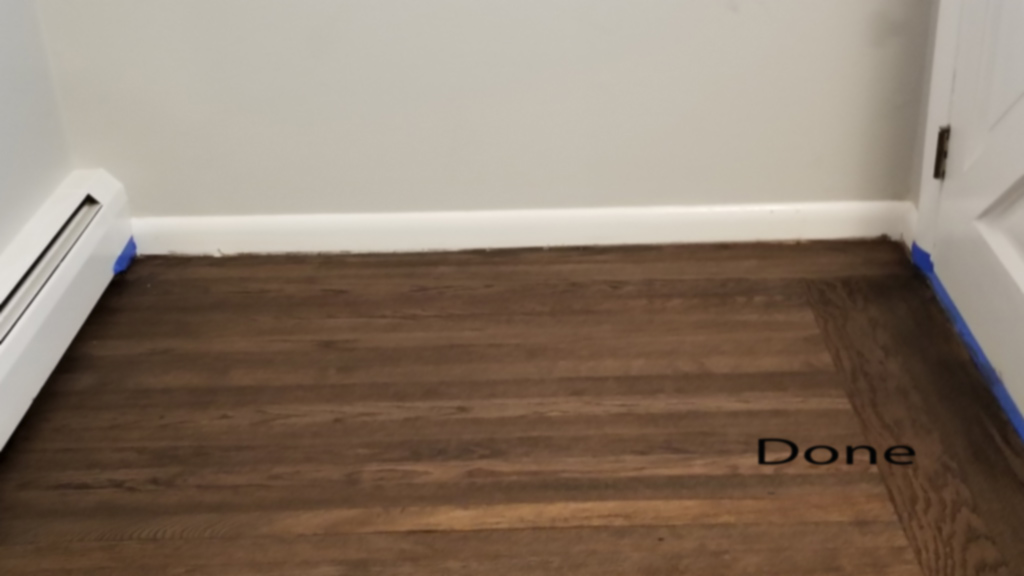 What a difference the repair makes for the formal entry, while saving the buyers money.
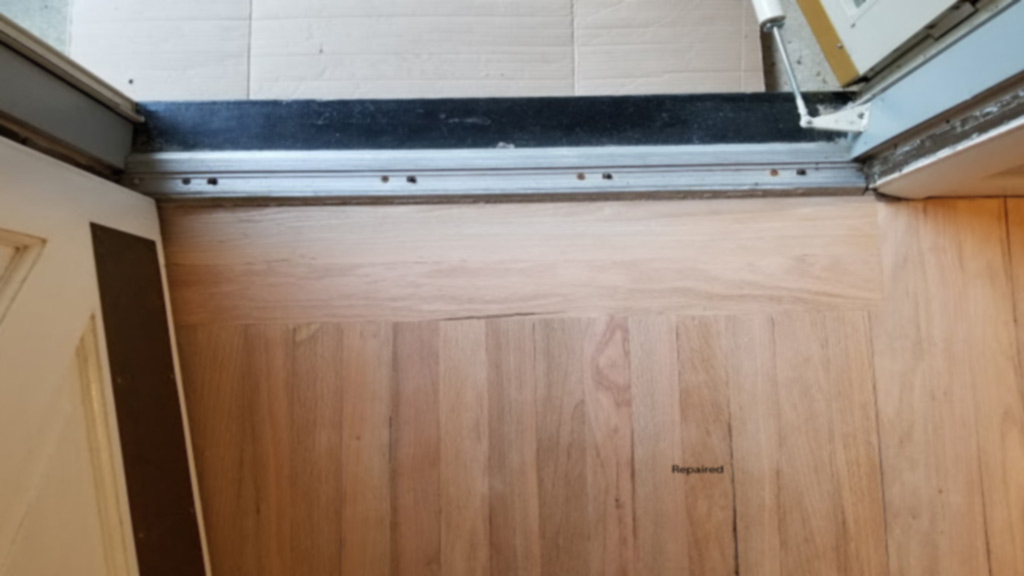 Look at the crisp clean repair where the donor boards were inserted perpendicular to the running of the floor. This tidies up the foyer threshold in a very cost effective manner. Note- the boards inserted here are pulled from the closet so they match perfectly.
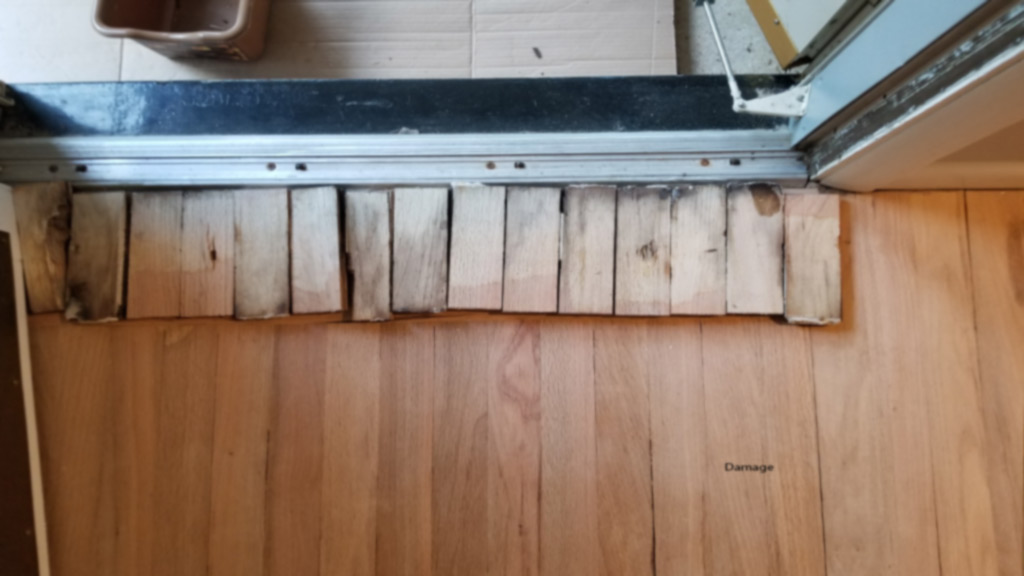 Here are the original damaged ends of the boards at the formal front door- they were cut out. See the water damage which includes the discoloration and the irregular distortion due to swelling

The Problem- Hardwood Damage From Leaky Storm Door
Inheriting several repair issues with this short sale, the formal entry looked as neglected as the rest of the house. Specifically it was clear that the seal or the frame of the door was leaking, and water seeped in through or under the door threshold causing warping and black discoloration to the small oak floor entry alcove. About 15 of the 20 or so boards were affected that also encompassed and opened in to the formal living room. Luckily the boards were about 3 feet in length. But, the ends of about 15 boards had damage.
When a homeowner experiences water damage involving their hardwood it is not uncommon for the damage to affect points of entry such as entry doors, sliding doors, and around windows. Also, damage occurs to floors from roof leaks or overflows, or from appliance or mechanical failures. When this occurs and left undiscovered, the wood can swell, warp and discolor leaving the wood looking grey or black.
Determining The Overall Scope of The Repair & Refinishing
The fix for these problems is to replace the affected boards and sand down the area where the repair is. Also, the scope of the repair must follow thru other continuous wood areas if there are no natural wood breaks. A wood ‘break’ is a defined line, transition or board where you can stop the refinishing to contain and isolate the refinishing project. A doorway can also suffice as a natural break, if you are okay with having a differentiation from one side of the door to the other (our experience is some folks are fine with that, while others cannot tolerate it.)
Simultaneously while tackling the wood repair, attention must be given to fixing the leak. And while we were not asked to do that, it was important that the homeowner fix it or get it fixed before more damage occurred to the new wood. Clearly being in construction, this homeowner was on it.
Organizing The Repair of the Damaged Area Prior to Refinishing
For this project there were 2 options to offer the client to decide upon for the repair. First would be to tear out and replace all 20-25 or so 3′ boards that are in the alcove-entryway off that leads to the formal living room, to the tune of about $650.00 (for about 15 boards swapped out.) Or, we could cut out the ends of each of the damaged boards and insert a couple rows perpendicular to how the boards run. This limits the replacement down to 2 or 3 boards across what amounted to be about 28″ across, bringing the expense down to about $200.00. Option No 2. cleans up the area but limits the repair, thereby saving labor, time and obviously the client’s money.
Swapping Out Donor Boards From The Closet
As we proceeded with the repair our tech decided to pop some boards out of the closet to insert in the entry, and then put the new boards in the closet.
Why? Well replacement wood, especially newer wood will always look different than the existing wood. By taking this extra step (which we did not charge extra for, but doubled our time & labor expense) the repair, although running a different direction, blended perfectly. The lesser of the evils was to install the newer wood that would look different in the closet, where it is less noticeable. In summation, does this have to be done–no, but in the end it gives the customer a better finished product they will prefer to live with moving forward.
The Final Step–Refinishing
Now the entry repaired and the pet urine spots bleached in other areas of the room (you can see pet urine project here.) the floor was ready to be refinished. On deck procedure wise was first sanding, which included drum sanding, edging with various grits of sandpaper, then hand scraping of the corners. After that the techs water popped the floor to open the grain and reveal finite areas that need further attention that is not apparent to the naked eye. One last test, the techs took humidity, or hygrometer readings to make sure the wood was with the dry standards to coat– below 8% humidity. It was time to stain, seal and finish they could proceed.
The stain was hand applied and hand wiped– then allowed to dry, roughly 8 hours to be safe (the longest period needed to dry.) Then the seal was applied and allowed to dry about 5-7 hours. Next was the first finish coat–with about 2 hours drying time, and the final coat about the same. It is important to note that to be safe we take humidity (a.k.a. known as hygrometer readings) between each coat so we don’t apply the next coat too soon. (Doing so could cause failure of the finish.)
Winter is an ideal time to finish hardwood floors. All drying phases of the project goes so much quicker. Rule of thumb, a personal barometer– dry, itchy skin season is a great time to refinish your hardwoods. Not only does it dry faster, with the boards contracting you get deeper penetration into the seam areas of the installation because the wood shrinks, so penetration of the stain seeps deeper between the boards.
With all coating done, and no trim to replace, we finished our work and packed up our stuff. As we handed the home back to our clients we went over the immediate instructions for a freshly coated floor, and also reviewed on going tips for care and usage. They were thrilled and promised to be gentle with the hardwood so it ‘wood’ look beautiful for years to come.