

Badly Sun Damaged Hardwood Floors Incite Major Repairs
- Home Case Studies Badly Sun Damaged Hardwood Floors Incite Major Repairs
 Badly Oxidized Floors Are Restored with Bleaching and Sanding
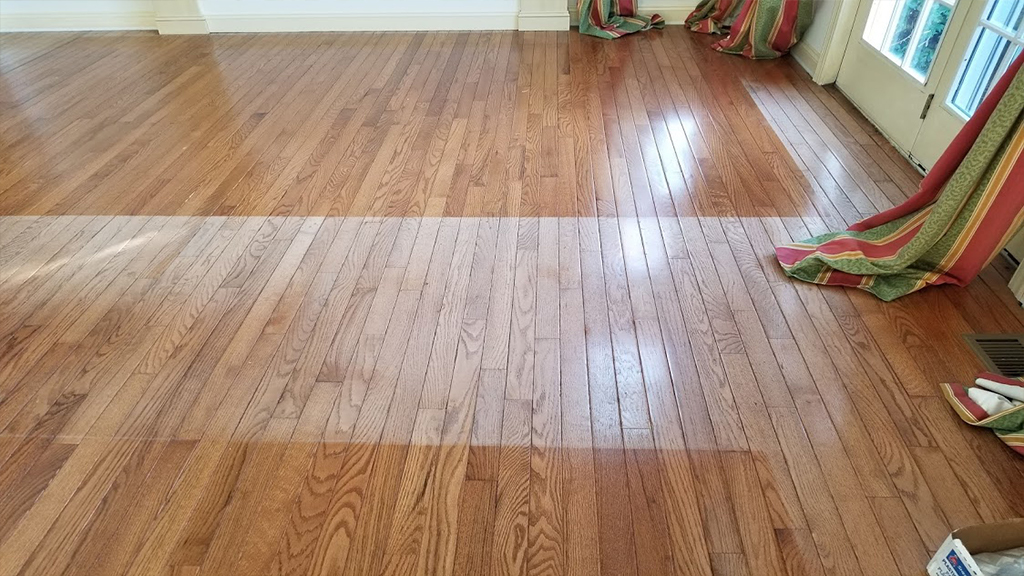 Severe bleached hardwood; hopefully can be repaired.
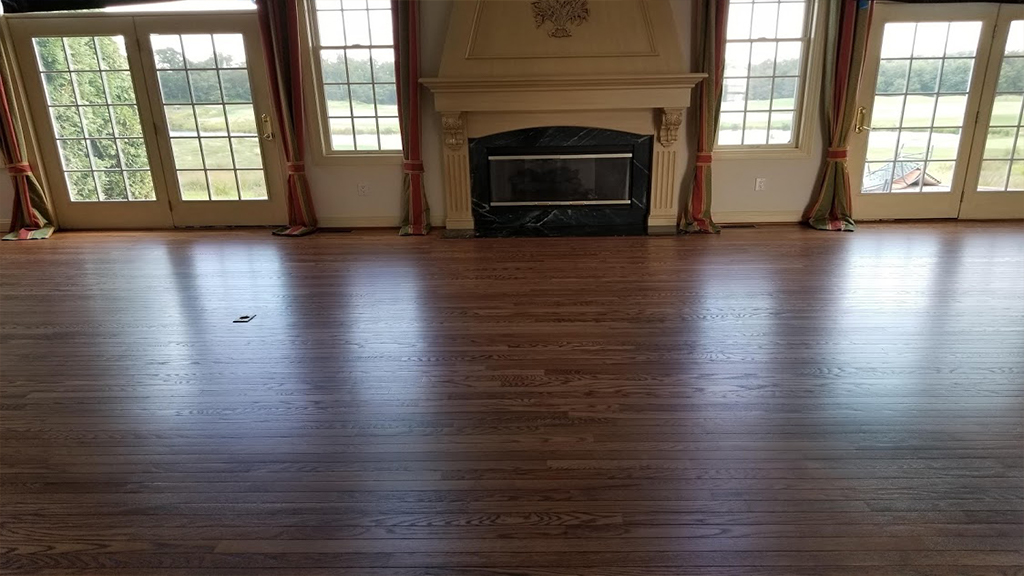 See How A Sun Faded Floor Can Be Fixed
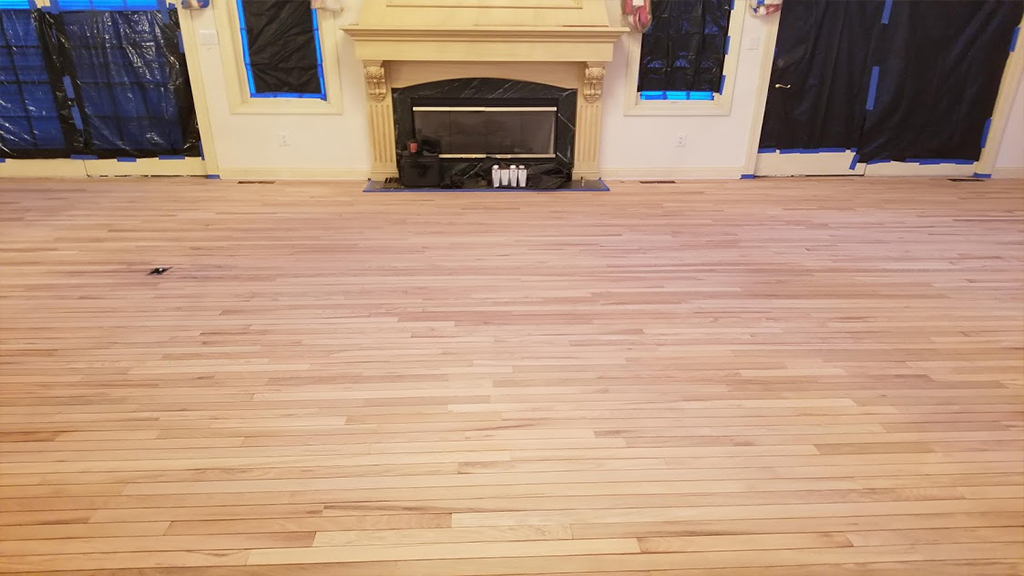 Sanded & Bleached Red Oak Floor Fixes Badly Oxidized Floor
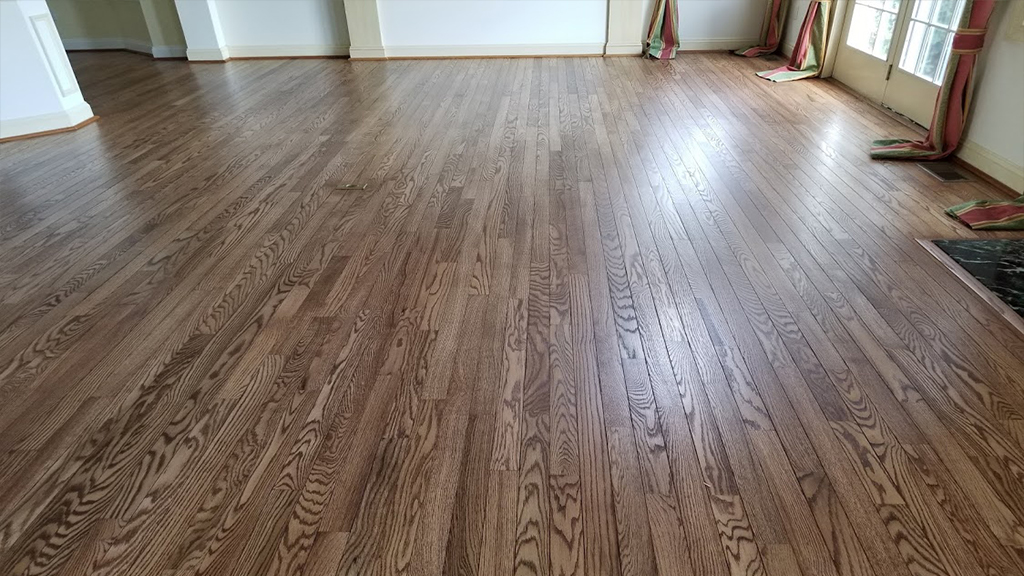
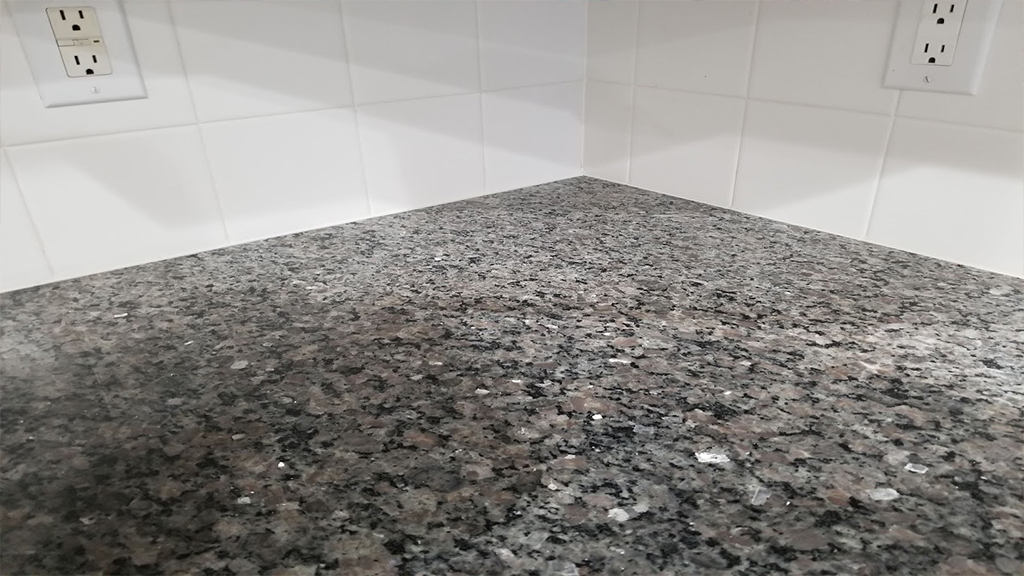 Sun Fade is So Severe it Damaged the Granite Counters As Well
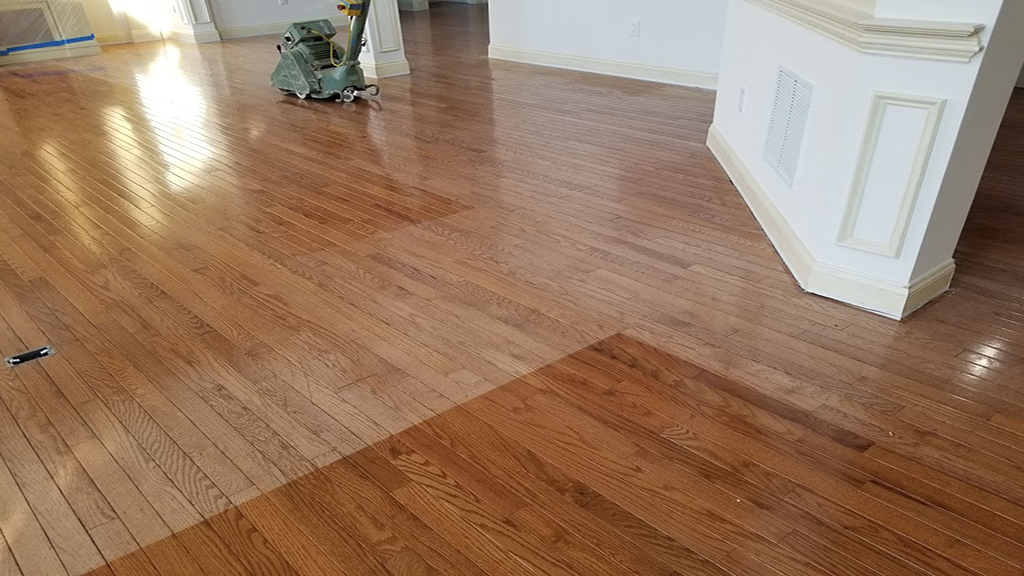 Major sun fade damage
 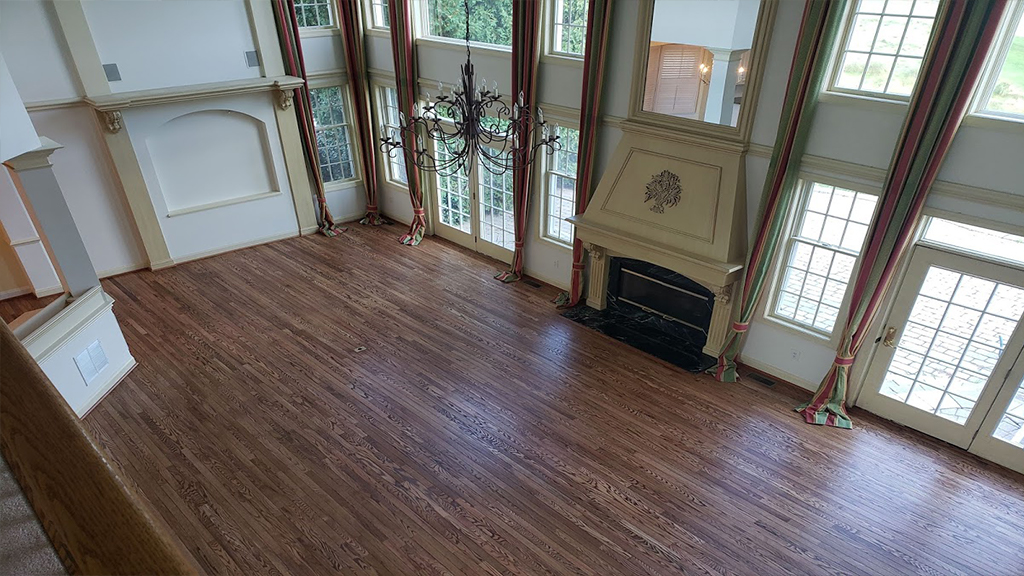 Look at the stunning results of the repairing and refinishing of the magnificent great room's oak hardwood floors. Sun Damage is reversed, and looks beautiful once again
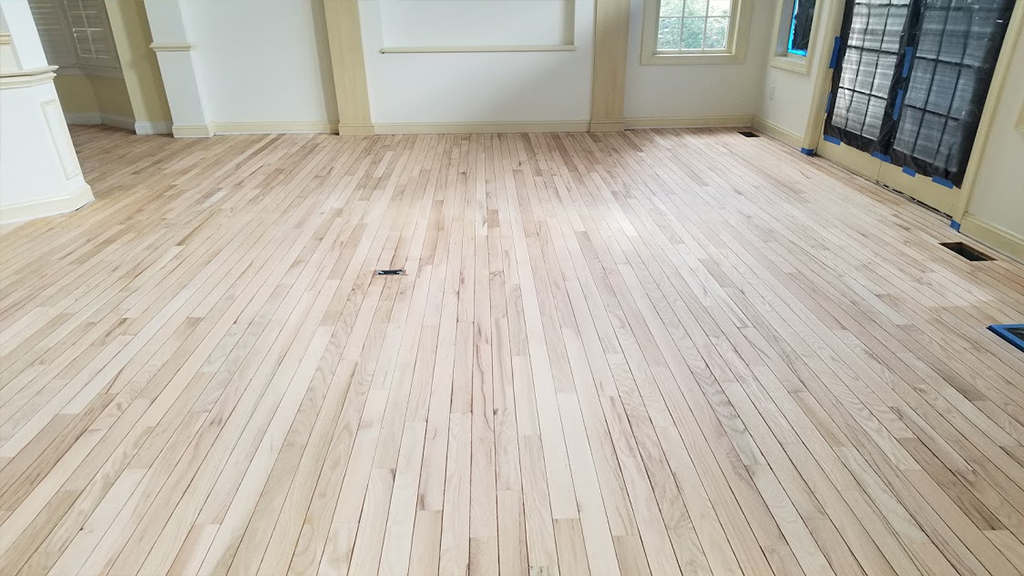 Bleaching The Sun Fade Lines are Fixed
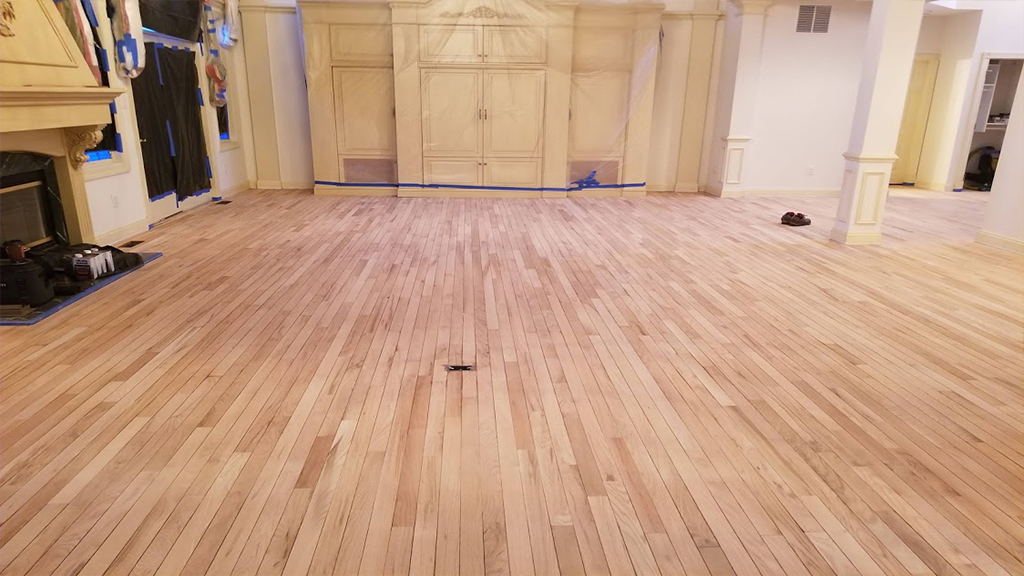 Severe Sun Fade Successfully Removed with Bleaching and Sanding
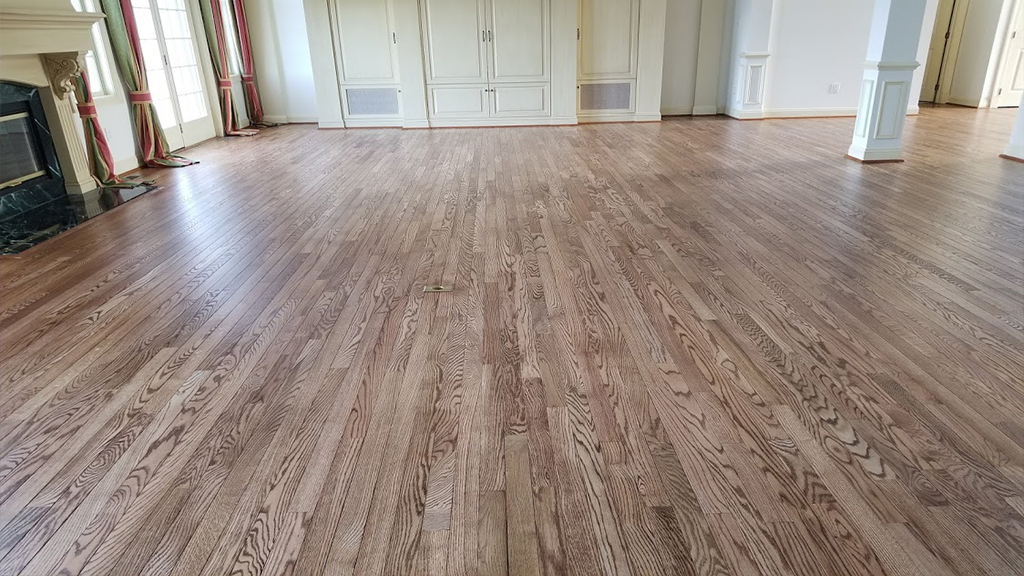 Sun faded red oak floor fixed
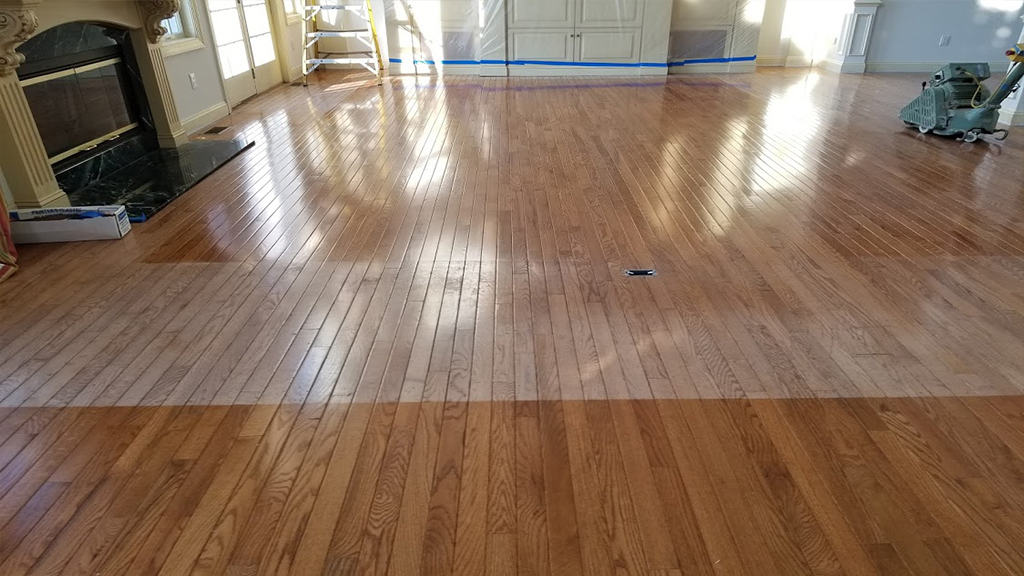 Bleached out oxidized red oak floor hopefully can be repaired

Sun Fade More Common in Florida, This Moorestown Home Needs Some Serious Hardwood Restoration
Excitedly, this very exceptional couple who will truly be a spark plug to their community, settled on a home with major sun damage in a swanky country club development in Moorestown. Our Lady client (solely whom we dealt with) only agreed to buy the house with the idea that any maintenance or improvements would be done using competent service professionals. Too busy for a ‘To Do List’, let alone a ‘Honey Do’ List, it became a priority to interview and hire qualified service professionals who would:
- Perform as promised.
- Communicate with the homeowners.
- Execute with precision within the timeline agreed upon.
- And deliver a superior customer service experience.
The Problem
While not in a new housing development, this house was probably built on farmland, so there were no mature trees to offer it shade. Also, the grounds are landscaped nicely with different fairways and greens behind this home and many homes, as the golf course meanders thru the development.
So, with no mature tree shading, the great room had large glass panes towering from 30′ down to the floor level. A magnificent room with no protection, so, the strong afternoon sun beamed in. One look under the area rugs vs the exposed area, revealed terrible fading. Then once the large area rugs were removed- wow, we are talking major sun damage. As we continued to explain the refinishing process, we also strongly encouraged to our client that she get the windows tinted to avoid a repeat of what happened.
We Had a Good Initial Meeting and Walk Thru
Our client was impressed with our information and thoroughness, and indicated she felt she wanted to give us the job and would let us know the next day (after consulting with her partner and vetting out the finish system we proposed.) With the hardwood presentation complete she invited us to give her an estimate for the carpet cleaning as well. Chris measured and gave her that estimate right then too. We shook hands and said we looked forward to working with her.
I have to say, I was impressed with this client from the first time we talked on the phone, just her tone of voice, but then when I met her in person… There is some quality about her, you just know you had to be on your A+ game (no problem for us, it is how we roll in all that we do.) Nobody could pull the wool over her eyes, and meeting you face to face is important to her. She does her research even before she calls you, and insists on validation of your credentials ahead of time. She’s a great judge of character, and can see and sense when someone is trying to get over on her. No worries, I think next time I’m thinking of hiring someone, I’ll have them meet her and see what she thinks of them. Anyway…
For us, this is our specialty. Our lead sander strives for perfection in his finished product. He leaves no stone un-turned. And because we cater to ‘everything floors and more,’ if invited we can capably handle her hardwood refinishing, her carpet cleaning, tile and grout deep steaming, and her stone polishing (and maybe a couple more things.) For her, it was one call, one company, and several things off her to do list right out of the gate!
Let’s Get The Party Started!
A day or so later we got the go ahead from our client. And, she was anxious to get started with the carpets, as we could do that sooner. It was a full day job for Chris, and we promised to “tent” and isolate the hardwood area, to protect the newly cleaned carpet. Then while there, our client asked if Chris would address the leather couch at some point (of course!)
Chris cleaned every square inch of carpet, sanitizing it and freshening it up, from top to bottom. It looked clean, smelled better and was now safe and inviting now that he got the previous owner’s dirt out (kind of like not wanting to share bathwater with a stranger.)
Day one of the hardwood project, we introduced the team. We spent most of that day erecting plastic tenting in the kitchen (to protect the cabinets and appliances.) We covered the huge custom media cabinet and the elaborate office cabinetry. We tented the second floor “catwalk.” We marked and removed the interior doors. Eventually we would have to cover the back-wall glass, both at the floor level, and most of the cathedral glass as well.
The Scratching Begins, Everything’s a Buzz
Scratching is one slang term for sanding, it was now time to begin. The first day of sanding usually focuses on cutting thru the weathered finish, and in this case, it also involved cutting the hardened distinct lines right where the edges of the area rugs laid. Much like a patchwork quilt, the damage and discoloration were significant. Our first sanding process usually begins with a mid-aggressive 40′ grit sandpaper. But in this case our tech elected to drop down to a 36′ grit, a more aggressive rougher grit to eliminate the major sun fade lines. However, by day’s end both techs became increasingly concerned because 36′ did not cut thru the finish, let alone even out the line differential. Quietly and with concern our tech dropped down to a 24′ grit, mostly considered overkill, and ripped the finish off the floor. In many cases this would be detrimental, but the floor was 3/4 inch, and had never been sanded, so we had plenty of thickness to withstand the aggressive layer removal. That was an extreme case of fading!
More Concern Develops
The finish is off, and the raw wood is exposed. But, the line differential from the sun fade was still distinctly apparent, and across a massive number of boards in the middle, along 2 edges, and along the back wall. The ‘next dance’ and decision presented itself– how were we going to calm the line down or remove it entirely. Deep breaths, and thinking cap on, we weighed the options:
- We could remove the affected boards, and install new ones- but that was out of the question, it would be more than half of the floor (cross that one off)
- We could bleach the lines with wood bleach (probably the better choice)
- We would have to test the stain our client selected on the board, and perhaps encourage her to look at the next darker stain so we could capitalize on losing the line this way
With confidence but concern, Wendy called the client to inform her of the dilemma. Working with natural elements like wood and stone, always keeps you on your toes. They hide secrets at times, and it requires patience and fortitude to plow thru them.
We asked our client to come to inspect and see the areas of concern. Bur before her arrival we prepared two stain samples on the line, the one she chose, and the next darker stain, which might be more successful in “calming” the line down. You see, ultimately the line differential will even out by itself over time, but depending upon the new owner’s decor, it may not be tolerable to expose the unsightly line until it evens out (so that was out of the question.)
Thankfully she arrived and was pleasantly surprised that the line was barely visible to begin with. Then she looked at the stain samples and kept with the original one as it masked the line adequately. Preferring that color she was delighted! And she was ok with the extra procedure delaying things by a day. Again she thanked us for communicating and showing her we had her best interests at heart. Luckily she had flexibility, and the extra time was not a critical issue.
Our Plan Solidifies, No More “Line in the Sand”
It was a team decision with our client’s approval to bleach the floor. Once bleached the line “test area” was so faint. We again verified that her original stain choice will capably mask the line, and proceeded to bleach all the ‘lined’ areas.
Back the next day we returned to uncover the bleached lines- they were barely noticeable. Yes, our dancing with the floor worked and we can keep moving.
Now past the line dilemma, we kept moving forward, now from the “rough sanding phase”, to the “fine sanding phase.” In plain terms it means we are working in concert first with the rough cuts on the “field” (the major part of the floor), then along the edges, and the corners.
The final sanding was coming to an end, and we could move to “water popping.” This is a critical added procedure that reveals issues not noticeable to the naked eye- i.e. damage, or imperfections in the sanding process. Water popping is encouraged and part of the NWFA Standards for refinishing most floors. One reason why is because it will show imperfections before the stain application. Secondly, it will open the grain when you are applying stain. All was good with the water popping procedure, so we can move to stain… almost.
Extra precaution needs to take place to cover the big large windows in the back of the house. This means those at the floor level, and those in the cathedral area as well. Carefully we had to get plastic to cover all the windows, and keep them covered till the stain, seal and two finish coats are all applied (three to four days.) Otherwise the stain and coatings could bake off faster where the hot sun beats in on the floor, making it look like different like the different Candy Land or Monopoly Now up on ladders at 30 feet carefully applying the plastic and tape, all the while gently using the ladder with protective foam on the top ends of the ladder as it is placed on the recently painted walls. Phew- glad that went well!
Time to Color… (Stain) Then Seal
All popped, sun blocked, we are good to go. The stain was mixed in a bucket so all quarts will blend evenly, and off to the races. The stain goes down for a section with one hand and ragged off with another, all with the same motion. It is quite the process and it must be done with precision starting in one corner, then moving thru the entire area, and out! Finally we got to stain!!!
The next am we couldn’t wait to see the results and dryness of the floor. To check, we use a digital hygrometer with 2 tiny penetrating prongs that are inserted between the boards to get a humidity reading of the actual floor. It must be between 4-8 %. Having done the stain late in the day to early evening, we did not rush to go back. Once back on the floor we had a little touch up (which can be minor but common when working for the results we strive for.) We checked several areas and had confidence we were good to go.
Next is the seal coat, which locks the color in. An easy application, it went on without a hitch. And, with any luck, with a 5-hour cure, we might be able to sneak the first finish coat in the same day (fingers crossed- about a 50-50 chance.) However, when we “stuck” the floor the answer was obvious, no coating the same day. It was too chancy. No worries, it is always better to be safe than sorry.
Getting To The Finish Line
We think we can, we think we can– finish! Taking our time the first finish coat was a piece of cake. And the following day we did re-installed the quarter round, putty’d the nail holes, and caulked the edge. Next we did the first finish coat, gently working against the quarter round so as not to disturb the fresh paint. Overnight again, and we were ready to prep the floor (final buffing) and apply the final finish coat, to be done. All went with incredible precision, and results we are thrilled with. The only thing left was putting the doors back, removing the plastic, re-installing the vent covers, doing the paint touch up we discussed ahead of time (heavy vibrating equipment and cloth bags, some times gently kiss the walls or trim which we say is inevitable, requiring a little paint touch up), a little dusting, and lets call it a rap!
One Badly Hammered Faded Hardwood Floor is Totally Revived, Brilliant & Gorgeous Once More
Delighted with the results we were anxious for our client to see the results. She was happy with what we reported to her, as she was down in Ocean City. Then when she saw the floors, she was not only happy, she was so appreciative in how we communicated with her and had her best interests in heart, and the results showed it! She saw that we did what we said we were going to do, from the top down. We went over the “exit instructions in detail” and she coordinated the other service professionals accordingly. With time on her side, best not to rush. Another successful job on the books.
But She Was Not Done
Turns out she asked us to steam her tile and grout, to repair a couple grout areas in the Master Shower. She had us condition the leather sofa and hoped we could help her with her granite counter top.
Turns out the granite also suffered from the strong sun. But time would have to correct that. We could not cheat time and restore the uniform color. She would have to replace it or live with it.
In all, it was a pleasure to serve this great customer. She truly appreciated our workmanship and professionalism, as well as giving her the customer service experience she had hoped we would provide. Having a keen eye for detail and an expectation for superior execution, it is a tremendous compliment that she is thrilled and is willing to sing our praises!
A job well done, and Team Sparkle is elated!