Wendy’s BlogEasy Way To Freshen Up Old, Tired Hardwood Stairs
Wendy’s Blog
Do your stairs look old and tired? Here’s a quick and easy way to fix and clean them up without tearing them out…
As folks are updating their stairs and railings as part of a renovation, some times they find they don’t have hardwood under their carpets. It is merely plywood that the carpet is installed on. And other times, maybe there is wood, but look like the dickens, its badly damaged or it might be a lesser grade, like cheap pine. And along with the treads, the risers also get hammered with a bazillion staples when the carpets were installed. Are these questions you have, or issues you want to tackle?
When faced with these issues, it might be an easy fix to install tread caps over the existing stair tread, either over the hardwood tread, or over the subfloor. And likewise, it may also be a neater, quicker fix to install a veneer cap over the riser (which is much cleaner and neater than puttying all the staple holes.
The Stair and Riser Material Will Cover Up A Multitude of Sins
When the details line up properly, and the tread caps don’t throw the height adjustment off (making it a trip hazard,) the tread caps are a great choice. In a recent instance, in our son and daughter in law’s case, it was the right thing to do.
They could have kept the pine treads, but the treads wouldn’t match the new red oak railing that was going to be installed. Therefore, we got stair tread caps to install over the pine treads. And along with them we got new riser veneer caps to quickly tidy up the risers for a better finished product.
First the open stair box ends on the lower exposed treads had to be cut off. Then the already painted riser veneer panels were installed over the pine risers. And next, after the treads were stained and finished to match (off site,) the hallway and railing, they were installed over the treads. This way we have a nice, tight fit that was secured and locked in.
So after the stair portion of the install was complete we could focus on the railing installation. First up, the newel posts and the newel rosette was installed. Two newel post sleeves were fabricated to slip over the existing, and secured firmly on the lowest tread at the bottom, and the short railing at the top of the stairs. Next the railing was secured to the rosettes on the wall and the newel posts. And the last of the railing assembly was to install the new spindles, aka balusters, that are simple black iron. And now with a little touch up paint, and trim we can say it is done and looks great!
Here is the finished staircase and railing done in red oak
Now our daughter in law is as happy with her foyer and stairs, she pretty much has everything just the way she wants it! And as you know, “Happy Wife, Happy Life!”
Please CONTACT US if you would like to learn more about upgrading your stairs and railings.
We won’t be bugging you, selling your contact info, or otherwise making you regret signing up. We will just be sending you an occasional message with articles and our digital magazine, Surface BUZZ, from time to time (you’ll love it, we promise!) and on occasion a little reminder that we are there for you for your surface care needs.


Do your stairs look old and tired? Here’s a quick and easy way to fix and clean them up without tearing them out…
As folks are updating their stairs and railings as part of a renovation, some times they find they don’t have hardwood under their carpets. It is merely plywood that the carpet is installed on. And other times, maybe there is wood, but look like the dickens, its badly damaged or it might be a lesser grade, like cheap pine. And along with the treads, the risers also get hammered with a bazillion staples when the carpets were installed. Are these questions you have, or issues you want to tackle?
When faced with these issues, it might be an easy fix to install tread caps over the existing stair tread, either over the hardwood tread, or over the subfloor. And likewise, it may also be a neater, quicker fix to install a veneer cap over the riser (which is much cleaner and neater than puttying all the staple holes.
The Stair and Riser Material Will Cover Up A Multitude of Sins
When the details line up properly, and the tread caps don’t throw the height adjustment off (making it a trip hazard,) the tread caps are a great choice. In a recent instance, in our son and daughter in law’s case, it was the right thing to do.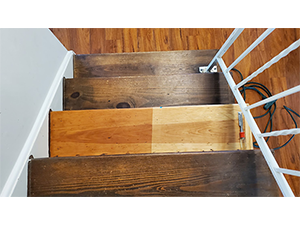
They could have kept the pine treads, but the treads wouldn’t match the new red oak railing that was going to be installed. Therefore, we got stair tread caps to install over the pine treads. And along with them we got new riser veneer caps to quickly tidy up the risers for a better finished product.
First the open stair box ends on the lower exposed treads had to be cut off. Then the already painted riser veneer panels were installed over the pine risers. And next, after the treads were stained and finished to match (off site,) the hallway and railing, they were installed over the treads. This way we have a nice, tight fit that was secured and locked in.
So after the stair portion of the install was complete we could focus on the railing installation. First up, the newel posts and the newel rosette was installed. Two newel post sleeves were fabricated to slip over the existing, and secured firmly on the lowest tread at the bottom, and the short railing at the top of the stairs. Next the railing was secured to the rosettes on the wall and the newel posts. And the last of the railing assembly was to install the new spindles, aka balusters, that are simple black iron. And now with a little touch up paint, and trim we can say it is done and looks great!
Now our daughter in law is as happy with her foyer and stairs, she pretty much has everything just the way she wants it! And as you know, “Happy Wife, Happy Life!”
Please CONTACT US if you would like to learn more about upgrading your stairs and railings.